Showing posts with label Jerky. Show all posts

Thursday, August 4, 2016

Choosing Your First Dehydrator


My first encounter with dehydrating foods was when we lived in Alaska during the 1970's. Drying meats and vegetables was a way of life for many of the people who lived in the state whose motto is “the last frontier.” For many locals fish and wild game were the primary things that were dried to supplement their winter stores. While we were stationed comfortably on an United States Air Force (USAF) base in which we were never in need of dried foods. The wildlife and fish stocks were so plentiful that many of us learned to dry fish and meats because that was simply the Alaska way. Or at least that is how I remembered it.

Needless to say, I have been dehydrating fruits and vegetables for along time and have gone through a variety of different dehydrators. Some of the first commercially produced dehydrators for home consumption were of the small round plastic variety that had a single heating element in the bottom and you adjusted a small vent on the top of the cover to regulate the heat. This was a basic no frills dehydrator, with no real way to regulate the temperature, it was pure trial and error. It would however work and I made more than my share of jerky on this type of dehydrator. I actually still have one in my shop (Ronco brand), but it is regulated to drying my pistol and rifle brass after it has been wet tumbled for reloading. I bought it for $3.00 at my local Goodwill store specifically for drying my brass. I am not sure if they still make these cheap single element dehydrators, but my advice is to avoid them at all possible costs. They are hard to clean, have a steep learning curve, and produce inconsistently.

This article is only going to cover fan mounted stackable type dehydrators. I have never used the rigid box type of dehydrators which have removable 'slide-in' trays. These rigid non-stackable type of dehydrators tend to cost twice that of stackable tray type dehydrators. Many people make the mistake of purchasing an expensive dehydrator, use it once or twice and then it sits in the garage to become next years garage sale item. Therefore, I do not recommend them as your first dehydrator. Buy one later if you like, but my recommendation is that you try a more modest costing stackable tray type dehydrator. You can always add more trays or accessories to a less expensive model as needed or simply buy a nicer dehydrator later if you so desire.


What To Look For In A Dehydrator

There are a variety of good dehydrators on the market and you do not have to break the bank to purchase one. No matter the brand, there are a few things that you should look for. One of the most important features in my personal opinion is that it has to have a fan to circulate the warm air as good air circulation is essential to getting a even dehydration throughout the unit. I have read some reviews that indicate that you need to rotate your trays during the process to get even drying, but I have never found that to be the case with units that have a fan for air circulation. It does not matter whether the fan is on the top or the bottom. I have two dehydrators (Nesco and L'Equip) one has a top mounted fan, and the other a bottom mounted fan. There is a differing of opinion on which is better, but I have found them both to perform about the same.

Another thing that you should look for is variable temperature control. Although I cannot vouch for the accuracy of the temperature dial on stackable home dehydrators, it is a nice to have one. Does my Nesco dehydrator actually heat to 135 degrees when I have it set to that? I am not sure, but if I had to guess I would say it would probably be somewhere within 10 degrees. Another thing to consider is are the trays dishwasher safe. Dishwasher safe trays is definitely a big bonus.


My Dehydrators

As I mentioned I have two dehydrators and I use them both. I change between the two depending on they type of food I am dehydrating. They both have fans, one mounted on the top and the other the bottom, and they both can stack up to 12 trays, however the most I have ever used is 6 trays.


Nesco FD-60 American Harvest Snackmaster Express
Power: 500W, Round Trays: 4, Temperature Range: 95 – 155 degrees

This was the first dehydrator that I purchased that had a fan. I have had the Snackmaster Express for about 15 years and it is still going strong. It has a top mounted fan, a decent temperature dial and it has 4 (1.125 square foot) round stackable trays. Although I have dried many different types of foods in this dehydrator, it is the only one in which I will make jerky simply because I do not have to worry about any liquid falling into the fan since it is on the top of the dehydrator. If you have read any of the articles on our blog regarding making beef jerky, this is the dehydrator you will see in those pictures.


While the open spaces on the supplied trays allow maximum air flow, they can be a little large and smaller vegetables and fruits when dried can fall through to the next tray on the bottom of the unit. Because the bottom of the unit is solid this is not a problem, I simply dump any thing that has fallen to they bottom out onto a paper plate, no muss, no fuss. You can buy small round 'Clean-A-Screen' mesh screens for $6.95 for two to keep smaller dried items from falling though (these come standard with the L'Equip). Additional trays can be purchased for $14.95 for two. The 500 watts means that it has a lot of drying power and it is expandable to a maximum of 12 trays. There is no on/off switch, just plug it in and it starts. The Nesco comes with a 1 year limited warranty.

Nesco still makes this model which in my opinion means that is it s pretty good performer. You can currently find it for about $55.75 on the Wal-Mart website, and on Amazon. It would be nice if it came with 6 trays, but I personally think this is a great first dehydrator, and if I ever find another on any of my garage sale excursions I will be sure to buy it.


L'Equip 528
Power: 500W, Rectangular Trays: 6, Temperature Range: 95 – 158 degrees

Out latest dehydrator, the L'Equip is a rectangular shaped dehydrator with the fan mounted in the bottom of the unit. The temperature gauge is basic with only three labeled temperature ranges 95, 125, and 158. There are of course gradation or 'marks' on the dial that appear to be increments of 5 degrees for each one. So for example three marks past 125 degrees would be 140 degrees, three marks below 125 degrees would be 110 degrees. Not a deal breaker, but I like the dial on my Nesco better.


The L'Equip comes with 6 rectangular (1.2 square foot) trays and while the holes in the trays are about the same size as the Nesco, each tray for the L'Equip comes with a small flexible insert that has smaller holes for dehydrating smaller cut vegetables which is a nice feature. In addition, I think the rectangular trays are a little more efficient space wise for drying foods although they have almost the same drying capacity per tray as the Nesco. The L'Equip comes with a 10 year limited warranty.

The L'Equip is definitely a nice dehydrator and is expandable to a maximum of 12 trays as is the Nesco. It is also 500 watts which means that it has a lot of drying power as well, and it has an on/off switch. The L'Equip 528 sells for $119.00 on Amazon as well as a variety of other vender's on the internet.


Cost Comparison

So before you make any decisions regarding these two dehydrators, we need to compare apples to apples. The Nesco is definitely cheaper (base price $55.75) but to expand it to six trays like the L'Equip we need to purchase two additional trays for $14.95 increasing the price to $70.70. The L'Equip comes with 6 small flexible inserts to make the holes on the tray smaller. So we need to purchase 6 'Clean-A-Screen' inserts for the Nesco at $6.95 a pair for a total of $20.85, making the total cost of the Nesco $91.55.

Nesco FD-60 American Harvest Snackmaster Express (Total Cost $91.55)
Power: 500W, Round Trays: 6 with 6 'Clean-A-Screen' inserts
Temperature Range: 95 – 155 degrees
Warranty: 1 year limited warranty

L'Equip 528 (Total Cost $119.00)
Power: 500W, Rectangular Trays: 6 with small screen inserts
Temperature Range: 95 – 158 degrees
Warranty: 10 year limited warranty

So at this point the two dehydrators are point for point equal, the only difference is the warranty. The cost difference at this configuration is a difference of $27.45 in favor of the Nesco making it 23% cheaper than the L'Equip. However the L'Equip has a better warranty.

I like both of the dehydrators a lot and we use them both frequently. I wish the L'Equip had a top mounted fan as I have had more than once had a few dried vegetables drop into the fan in the center column. I wish the Nesco came standard with the 'Clean-A-Screen' screens, but it does not, and I have not found this to be a problem. In fact, until we got the L'Equip, we never even knew this to be an option.


Conclusion

Based on my experiences with both of these dehydrators, if I had to make a recommendation between the two (Nesco Snackmaster and the L'Equip 528) to someone who was buying their first dehydrator, I would have to recommend the Nesco simply because of the initial purchase price of $55.75. I realize at this price, the Nesco does not have all of the features of the L'Equip, but the initial investment is 53% cheaper (55.75 / 119.00 = 0.468), and you can always expand the number of trays as the need arises. I have been using my Nesco as I stated for 15 years and still only have the four original trays, and it has more than outlived either of the two machines warranties.

The bottom line, I like my L'Equip, and if money was not a problem, I would choose the L'Equip. Having said that, if I had to choose only one I would buy the snackmaster for two reasons, 1) because of the lower initial investment, and 2 ) simply because I make a lot of jerky and think it is a better dehydrator for that particular application. Therefore, if you are looking to purchase your first dehydrator and you are on a budget you cannot go wrong purchasing a Nesco Snackmaster FD60. As always, if you have enjoyed this article, please share it with your friends and don't forget to send us a friend request on Facebook and Google+ so that you will not miss out on any of our new articles.


Other Related Articles On Our Blog:


Wednesday, January 13, 2016

Make Your Own Jerky Spice Mixes


Wow, I knew a lot of people liked to eat Jerky, but I was surprised by the number of email responses asking about additional jerky recipes that I might have or use when making ground meat jerky. In my original article I included my own recipe for my 'original style' beef jerky made from 3lbs of 93/27 ground beef. When it comes to jerky making my 'original' style is my go to recipe. In fact, it is my base recipe for all of the different jerky flavor combinations that I make.

As I mentioned in my original article, I recommend that you use a cure when making ground beef jerky to help keep it safe and shelf stable. If you have been using any of the pre-packaged jerky spice mixes in the past or continue to do so, you will fnd that if you look at the ingredients list you will find that it contains a curing agent. Most often in the form of nitrates and nitrites, the same ingredients that you will find in Morton Tender Quick that I use.

All of the jerky recipes I use are variations of my 'original' style recipe with the addition of a seasoning blend or spice mix. Now, I have found many commercial seasonings or spice blends tend to be heavier in salt than I like, so I make most of my own seasoning blends or mixes such as Jamacian 'Jerk' seasoning, and 'Creole' seasoning. When I make my seasoning blends, I omit the salt so that I have a more control of the salt content in the final recipe. In a future article I will share with you my recipes for a multitude of spice blends that I use that have no added salt if there is enough interest in them. For now, however, using a commercial spice mix in such small quantaties my not make much difference, but if your jerky comes out slightly salty, then my recommendation would be to cut back on the seasoning or spice mixture to reduce the sodium content. Do not however cut back on the curing salt (Morton Tender Quick) as your jerky's shelf like will be greatly diminished.


The Recipes

Below you will find the most common recipes I use when making jerky. In my original article 'Ground Beef Jerky' I made a 3lb batch of 'original' style jerky out of a 3lb chub of 93/27 ground beef purchased on sale at our local Walmart for $3.99lb. Most of the time however, I like to divide the chub into 1lb portions and make three different varities of jerky at one time. In addition, my original article I mentioned Howard Reitier Eau Claire County Master Food Preserver's recommendations for the use of Morton Tender Quick in ground beef jerky. Although I have never met the man, his recipe became the basis of my 'origonal' style ground beef jerky recipe which I have adjusted over time to suit my personal tastes. I have included his orignal recipe in this article for those of you who might be interested in trying it.


Ground Beef Jerky (Original Style)

1 pound ground beef
2 ½ teaspoons Morton Tender Quick
1 teaspoon onion powder
1 teaspoon garlic powder
1 teaspoon soy sauce
1 teaspoon worchestershire sauce
½ teaspoon liquid smoke
½ teaspoon black pepper
¼ teaspoon paprika
¼ teaspoon ground cayenne pepper

Mix all the ingredients together. Set the dehydrator on the recommended setting (145 – 155 degrees) for meat jerky and follow the manufacturer’s instructions for time. When the jerky is done (about 6 to 7 hours) allow to cool completely and store in an airtight container.

You will note some small amount of fat that has pooled on the jerky when it is dried. Simply take a paper towel and blot the fat before the jerky dries completely or you will have small white spots on the surface of the jerky. It won't hurt the jerky, but can make it less appealing to some people. In the culinary world, the appearance of food and how it is presented can be just as powerful and the taste.


Ground Beef Jerky (Jamacian Style)

1 pound ground beef
2 ½ teaspoons Morton Tender Quick
1 tablespoon jerk seasoning
1 teaspoon onion powder
1 teaspoon garlic powder
1 teaspoon cayenne pepper or 1 dried habernaro pepper ground
1 teaspoon soy sauce
1 teaspoon worchestershire sauce
½ teaspoon liquid smoke
½ teaspoon black pepper
¼ teaspoon paprika

Mix all the ingredients together, and follow the directions for the 'original' style jerky.


Ground Beef South African Jerky (Biltong)

1 pound ground beef
2 ½ teaspoons Morton Tender Quick
2 teaspoons worchestershire sauce
1 teasppoon coriander powder
1 teaspoon black pepper
½ teaspoon onion powder
½ teaspoon garlic powder
½ teaspoon liquid smoke
¼ teaspoon ground cayenne pepper (optional)

Mix all the ingredients together, and follow the directions for the 'original' style jerky.


Ground Beef Jerky (Creole Style)

1 pound ground beef
2 ½ teaspoons Morton Tender Quick
1 tablespoon creole seasoning
2 teaspoons Louisania hot sauce
1 teaspoon worchestershire sauce
½ teaspoon liquid smoke
½ teaspoon onion powder
½ teaspoon garlic powder

Mix all the ingredients together, and follow the directions for the 'original' style jerky.


Ground Beef Jerky (Buffalo Wing Style)

1 pound ground beef
2 ½ teaspoons Morton Tender Quick
2 teaspoons Buffalo wing sauce
1 teaspoon worceshtershire sauce
1 teaspoon onion powder
1 teaspoon garlic powder
½ teaspoon liquid smoke
½ teaspoon black pepper
¼ teaspoon paprika
¼ teaspoon ground cayenne pepper

Mix all the ingredients together, and follow the directions for the 'original' style jerky.


Ground Beef Jerky (Teriyaki Style)

1 pound ground beef
2 ½ teaspoons Morton Tender Quick
2 teaspoons Teriyaki wing sauce
1 teaspoon worceshtershire sauce
1 teaspoon onion powder
1 teaspoon garlic powder
½ teaspoon liquid smoke
½ teaspoon black pepper
¼ teaspoon paprika
¼ teaspoon ground cayenne pepper (optional)

Mix all the ingredients together, and follow the directions for the 'original' style jerky.


Ground Beef / Ground Venison Jerky (Howard Reitier Eau Claire County Master Food Preserver)

1lb ground beef or ground venison
3 tablespoons brown sugar
2 ½ teaspoons Morton Tender Quick
1 teaspoon onion powder
1 teaspoon dry mustard
½ teaspoon garlic powder
¼ teaspoon cayenne pepper
¼ teaspoon white pepper
½ teaspoon liquid smoke

Mix all the ingredients together, and follow the directions for the 'original' style jerky.

There you have it, these six recipes will just about cover any type of jerky seasoning that you can find on the internet or on the shelves of your local supermarket or outdoor store. If you like your jerky hotter, just add some red pepper flakes. These recipes are quick and easy to make, and most of you will have the necessary ingredients needed in your pantry. I suggest that for the first time, you make the recipe as it stands, then adjust the seasonings to suit your own personal preferences. I promise you you will never go back to commercially prepared jerky seasonings again.


Jerky Seasoning Ingredients

As with most food spice mixes, there are a lot of preservatives and anti-caking agents included in commercial jerky seasonings. I am not bashing the makers of commercial jerky spice mixtures, or Backwoods in general, rather they are required by the USDA to maintain specific ingredients to make sure their products are safe for human consumption. As you can see, making your own jerky seasonings really cuts down on some of the extra ingredients that you do not need to make geat quality jerky at home.

Backwoods Original Jerky Seasoning – Salt, worceshtershire powder, monosodium glutamate (MSG), garlic salt, carboxymethyl cellulose, chili pepper, spices, mustard, malic acid, natural flavorings (spice extracts), onion, less than 2% silicone dioxide added to prevent caking, paprika, granulated garlic, red pepper, dextrose, spices and with less than 2% tricalcium phosphate added to prevent caking. Cure Ingredients: salt, 6.25% sodium nitrate, FD&C red #3 (for color), and less than 2% silicon dioxide as a processing aid.

Homemade Original Jerky Seasoning Mix – Onion powder, garlic powder, black pepper, paprika, ground cayenne pepper, soy sauce, worchestershire sauce, liquid smoke. Cure Ingredients: salt, destrose, 0.5% sodium nitrate, 0.5% sodium nitrite.

So if you are interested in what you serve you and your family, then check out the ingredient list of your favorite jerky seasoning package and see just what you are ingesting. Being inquisitive gives you the power to make your own food decisions and not rely on those of the federal government or big food production companies.


Conclusion

So there you have it, all the recipes you need to start making a vast variety of jerky seasonings. Believe me it is not difficult. I know I have left a few flavors out such as BBQ, but hey simply substitute your favorite BBQ rub or seasoning for the Creole or Jamacian seasoning and there ya go. If you grow jalapenos or any other peppers in your garden, then dry some and turn them into your own pepper powder and use as a substitute for the cayenne. The posibilities are endless, and with these recipies you have total control when making your own jerky.


Related Articles On Our Blog:

Friday, January 1, 2016

Ground Beef Jerky


I do not know about your family, but everyone in mine loves some beef jerky. This one time survival food made of dehydrated wild game and or beef and spices was the food of choice of travelers before the time of refrigeration. In fact, drying and dehydrating foods is still a very popular method of preserving both meats and vegetables. The one major advantage we have over our ancestors when it comes to drying meats and making jerky is the types of both wet and dry spices that we have to flavor our meats with. Jerky is a high protein, low carbohydrate food great for athletes, diabetics, and other's who need a nutritious snack that is low in carbohydrates, but still provides plenty of energy.

While I have made lots of jerky over the years using sliced whole meats, in this article I am going to focus on making beef jerky using ground meat. This is the most common form of beef jerky that you will find on your grocers shelves because using ground meats make the finished product easier to eat (i.e. it is not as tough) as using whole strips of meat which is one of the most common ways jerky is made at home. For this article I will be using ground beef, specifically 93/27 or 93% lean ground beef, the other 27% being fat. Now you can use more lean ground beef if you wish, but do not use any ground beef that has a higher fat content of 30% as the high fat content just does not perform as well.

The bottom line, the higher the fat content the lower the shelf life of the product as fats tend to go rancid over time. Wild game such as venison is great for making jerky as it tends to be extremely lean. In fact some hunter's even add a small percentage of ground beef to their venison jerky just to give it a small amount of fat.


The Original Recipe

This is my original base recipe. From this recipe you can add additional cayenne pepper or red pepper flakes if you like your jerky spicy. Like my friend Steve Coyne, I dehydrate my jalapenos and habanero peppers and grind them into powder. For hot and spicy, I simply use these as an alternative to cayenne pepper. For a teriyaki jerky substitute teriyaki marinade for the soy and Worcestershire sauce.

3 pounds ground beef
1 tablespoon sea salt
1 tablespoon onion powder
1 tablespoon garlic powder
1 teaspoon paprika
2 teaspoons soy sauce
2 teaspoons Worcestershire sauce
1 teaspoon liquid smoke
¾ teaspoon prauge powder no.1 (optional)
½ teaspoon black pepper
1/8 teaspoon ground cayenne pepper

Place the ground beef, garlic powder, onion powder, sea salt, black pepper, and optional prauge powder in the mixing bowl of your stand mixer and run until thoroughly mixed. Then add the soy sauce, Worcestershire, and liquid smoke, and then pour it into the mixing bowl with the ground beef. Run your mixer until well combined. Cover and marinate for 3 to 6 hours in the refrigerator. I usually marinate my jerky mixture overnight to allow the flavors to permeate the meat completely.

Chef's Note: If you do not have a stand mixer then use your hands, it works great this way, just make sure you mix all the seasonings and flavoring thoroughly.


Form the meat into strips, about 1/8-1/4” thick, using your jerky gun. If you do not have a jerky gun you can make the jerky into small balls and then flatten them with your hands or a rolling pin between two sheets of plastic wrap or wax paper until they are 1/8 to 1/4" thick, then place them on the trays of your dehydrator.

Dehydrate in a dehydrator at 145 - 155 degrees (F) for 6-12 hours. Place the jerky strips on paper towels to cool and to absorb any excess fat.

Chef's Note: My experience has shown that my ground beef jerky when dehydrated at 155 degrees per my Nesco dehydrator takes only 6 – 7 hours. Of course the way you load your dehydrator and the brand you have may make a difference. To facilitate drying, I turn my trays opposite of each other to allow maximum air flow over the meat (i.e. cross stack them).

As for storage, I place my jerky in large mason jars and store it out of the light. For long term storage you may want to vacuum seal some and place them in the freezer or on your pantry shelf in a tote so they are not exposed to light.


Cost Analysis

There are a ton of beef jerky maker's out there in the market place and wide variety of flavors. That is the great thing about making your own jerky is that you can tailor it to your own specific tastes. The primary recipe in this article is to show you how to make an 'original style' jerky that is mild in flavor but still tastes better than anything you can buy on your local supermarket shelves. As always, the great thing about making your own jerky is the amount of money you save doing so. For price comparison, you will see four of the most popular brands available at my local Walmart listed below.

Great Value Original Beef Jerky 3oz package $3.98 ($1.33 per ounce)
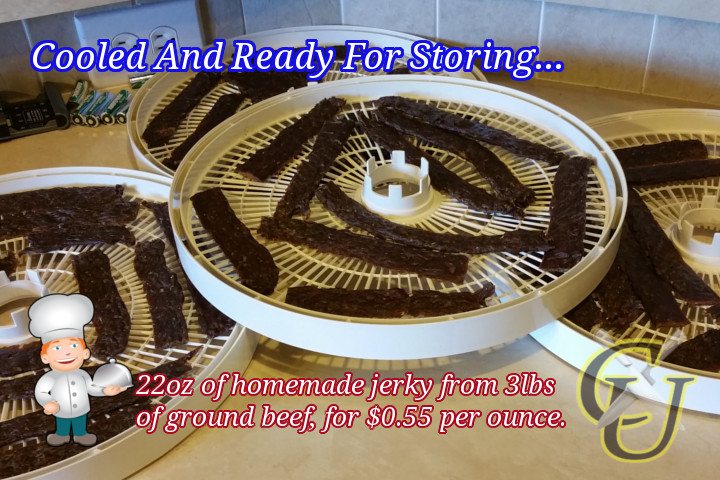
Homemade Original Style Beef Jerky 23oz ($0.55 per ounce)
Jack Links Original Beef Jerky 2.85oz package $3.98 ($1.40 per ounce)
Oberto Original Beef Jerky 2.85oz package $3.98 ($1.40 per ounce)
Sweet Baby Ray's Original Beef Jerky 3.25oz package $3.98 ($1.22 per ounce)

As you can see just reading the prices that I found on the Walmart website, our home made beef jerky is 59% cheaper than the Great Value brand original style jerky, and 62% cheaper than the Jack Links or Oberto brands of original style beef jerky. At it's minimum amount of savings, you get more than 50% jerky for the same price when you make it at home…..That's at least 50% off!

Addendum: My wife tells me after I weigh all my jerky to determine my yield that she and my grandson had been secretly eating some the jerky then rearranging it on the trays while it was cooling. They did not eat a lot, but I probably had an extra ounce or two more than I state in this article for my final yield, but we will leave it at $0.55 per ounce for home made jerky.


Curing Salts and Jerky

Curing salts are not necessary to make jerky, they are simply an insurance precaution if you will, and one that commercial manufacturer’s have to use. Most of my jerky never makes it past 3 weeks, but I do have curing salt (Prauge powder no. 1) in my pantry just for sausage making as well as Morton Tender Quick. If you are at all concerned about the safety of the jerky that you will be serving your family, or you wish to store it for more than 2 weeks, then you will need to use a curing salt. I will be honest I do not generally use a curing salt on whole meat jerky unless I am sharing the end product with friends and family who will be taking it home. Ground beef jerky for some reason tends to spoil faster if a cure is not used (about 2 weeks). So my recommendation is that you find a cure you like and use it whenever you are making jerky from and ground meat. There is nothing worse than having your jerky go bad or making your friends and family sick. The decision to use curing salts is yours to make, most of our ancestors survived even the harshest times eating dried meats without the use of curing salts, but for ground meat jerky, I recommend you use a curing salt.

The most common curing salts used in sausage and jerky making are Prauge powder no.1 and Morton Tender Quick. Tender Quick is probably the most readily available and most of you will be able to find it on one of the isles of your grocers shelves, and it is the cheapest of the two options. Prauge powder No. 1 is not only a cure, but a flavor and color enhancer that helps sausage maintain it's color. Prauge powder is the most expensive option, but is a better flavor and color enhancer which is more important in sausage making then in jerky making. If you have no desire to make your own sausage, then buy the Morton Tender Quick, it is cheaper and just as effective for jerky making. FYI, The batch of jerky that I made for this article did not include a curing salt, rather I listed it as optional ingredient as I was out of Morton Tender Quick at the time, and I wanted to save my prauge powder for sausage making. While we ate most of it, a few pieces that were not eaten right away became doggie treats as they began to mold at about 13 days.

Prague Powder No. 1

Prague powder is a curing salt made of sodium nitrite (6.25%) and sodium chloride (93.75%) which is specifically regulated by the FDA and USDA. Sometimes called 'pink curing salt' or 'tinted cure' it is a popular curing salt used in making sausage and jerky, It is a food stabilizer and flavor enhancer, and using prauge powder helps to prevent food poisoning by inhibiting bacterial growth as well as providing a distinct flavor and helps to prevent discoloration of sausages and jerky.

The FDA and USDA recommend that you use one ounce of Prague Powder #1 for each twenty-five pounds of meat (1oz per 25lbs) that you are going to make sausage or jerky with, or 1 level teaspoon of for 5 lbs of meat (1tsp per 5lbs). If I am going to make a batch for long term storage. When using prague powder in my jerky, I use 1/4 teaspoon per pound of raw meat. A 1lb bag or prauge powder sells for about $13.00 ($.81 per ounce) over the internet with free shipping.

Morton Tender Quick

Morton Tender Quick is a curing salt made of sodium nitrate (0.5%), and sodium nitrite (0.5%), sugar, and propylene glycol (water absorbent) that can be found in many local grocery stores. You can use tender quick as a direct replacement for the salt listed in your jerky recipe. Morton Salt's recommendation is to use 1 tablespoon of tender quick per each pound of raw meat in your recipe as a replacemenet for all other salts (iodized, kosher, or sea salt). Howard ReiterEau Claire County Master Food Preserver recommends using 2 ½ teaspoons of tender quick for each pound of raw meat used to make jerky. As for me, I have always gone with the recommendation of the Master Food Preserver and use 2 1/2 teaspoons of Morton Tender Quick per 1lb of my ground meat jerky with great results.

So for the recipe in this article you would omit the optional prauge powder and substitute 4 ½ teaspoons of Morton tender quick (3lbs meat x 2.5 = 7.5 teaspoons) for the sea salt. A 2.5lb bag of Morton Tender Quick is $5.31 ($02.6 per ounce), quite a bit cheaper than prauge powder, but it does take more as it is a direct replacement for the salt called for in the recipe.

Chef's Note: Do not confuse prauge powder with 'Pink Himalian' salt, the color may be similar, but they are not the same salts and cannot be used interchangeably.


Conclusion

Beef jerky is a great low carbohydrate protein packed snack food that is easy to carry, stores extremely well when made with a cure. Heck, jerky is one of the foods that helped America tame the wild west! Athlete, homesteader, prepper or just plain family man or woman, you need to know how to make your own jerky and have some on hand. Not just because it is great to eat, but it is a great survival food.

If you and your family like beef jerky and you are buying it at your local grocers, then you are definitely paying to much much for a product you can make much better and cheaper at home. When it comes to flavorings, make it as hot and spicy as you like, BBQ and Teriyaki flavors are popular, or go for something different like chili lime. That's the great thing about making your own jerky, you have total control of what goes into it and how it tastes. As always, if you have enjoyed this article, please share it with your friends and don't forget to send us a friend request on Facebook and Google+ so that you will not miss out on any of our new articles.


References:


Check Out Steve Coyne's Vegetable Blog: I Grow Vegetables


Other Money Saving Articles On Our Blog: